Tuesday, October 26, 2010

Cord Pet Peeve


 One of my biggest pet peeves is "cords".  

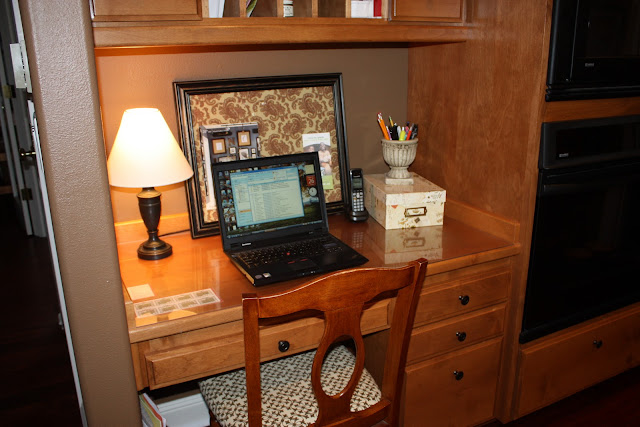
In the picture below you can see the cords/outlets that I stare at every time I'm on the computer. The paper "catch all" above the outlets is for notes/reminders and I posted about it here.  I like the note holder, but as with everything else in the kitchen/family room lately..."the red has to go", and I'm tired of looking at the cords. 

I think I can re-use this note holder in my daughter's room for a future project.


I decided to recover a bulletin board and lean it here to hide my cords/outlets.

This board is actually a piece of mylar board.  It works just like a cork bulletin board.


I worked the fabric (less than 1/2 a yard) around the board from 
end to end, and attached with my staple gun.


Once I had some staples in the top and bottom, and the left and right sides,
I began folding the corners.


Gather the corner fabric and pleat it before adding staples.


 Be sure your mylar board is cut a "hair" wider and longer than the frame
opening in order to squeeze it in to fit snuggly.


Here's the final look.  What outlets?  What cords?


Well, there is just that one cord to connect the laptop, 
but it's essential so I'll have to live with it?!


This desk top also has a piece of plexi glass that I added years ago.  It's nice 
to protect the desk top finish and it doesn't hurt to keep weekly reminders handy 
(what bills need paying, garbage pick up schedule, etc).  

Home Depot cut this plexi glass to size for me free of charge.


Stay tuned for a kitchen curtain made out of the same bulletin board fabric!

I'm linking to the following parties:


Sunday, October 24, 2010

We had company this weekend...


...and I didn't even have to clean house for them.

Actually, they brought their own house (gotta love that).


Before you think, "rats", they're gerbils.  

My daughter did not appreciate us referring to them as rats.  

They are her 4th grade class pets, and they get to go home on the weekends with the kids.


 This is Curious.
 

And, this is George.


They came with everything we needed, food, exercise ball, chew toys...
they love to chew. 


They weren't supposed to bite, but they did nibble on the kids hands a little bit.


They're actually pretty friendly little guys.  
Every time we walked by the house they came out to say hi! 


See Sadie on the right?  They were great entertainment for her too!


They both look "curious" to me.


Back to school tomorrow.  We'll miss them.


My kind of guests, no clean-up before OR after :)


Wednesday, October 20, 2010

Teach Your Children Well ~


(Can you hear Crosby, Stills & Nash finishing that title?)

This summer I tried to teach my kids the difference in the right way to do a chore, and the wrong way.  I firmly believe teaching a chore to a child is a chore in itself, but hopefully the pay off is well worth it.  
Patience is key!  

Some of the chores on their lists included cleaning their rooms (putting things in their place, not just sweeping them under the bed or in the closet....PATIENCE IS KEY), walk and feed the dog, unload the dishwasher (without breaking too many items...PATIENCE IS KEY), taking out the trash, watering plants, dust busting and sweeping, cleaning out the car, etc

The art of cleaning fingerprints off all the molding.


"Loving this job, Mom!"


Unloading the dishwasher, looks like 1st thing in the morning.


These were peeled by my daughter....I forgot to get the shot in progress.


Sadie, is always wondering when it's time for her walk???


 Funny, how most of the time I had to track down this sweet child for his chores...
he prefers having his picture taken when he's having a good time.


Trust me, he got his chores done too, it just usually 
required a little more reminding on my part.

They did a pretty good job keeping up with their chores, but now that school and sports have taken over our lives, there's hardly anytime for them to do anything else.  Between homework, school projects, sports practice/games, and the 
necessary "down time", their days are pretty full!

The good news is only 2 more weeks of sports!  
As much as I love watching them play sports, 
I'm looking forward to a change in the routine.   
They may not be so excited?!

What kinds of chores do your kids do? 
Any suggestions for getting kids enthusiastic about doing chores?  
(Is that a stretch?)


Saturday, October 16, 2010

Ghost Tree ~


I'm having a good time preparing for the upcoming 4th grade Fall/Halloween Party.  

As much as I talk about "weaning" from these school responsibilities, 
I have to admit the party planning is kind of fun. 

This is a treat for the kids in the classroom and something my daughter could help make.

You start out with a Tootsie Pop. 


Wrap the Tootsie Pop with a paper towel, 
(we used the paper towels that pull apart into half sizes).

 Tie a yarn ribbon around the ghosts neck and add eyes/nose with a black Sharpie.

I spray painted this terra cotta pot with black chalkboard paint and added 
the "Trick or Treat" with chalk, what else?


This styrofoam "tree" worked great to poke the Tootsie Pops into.


I carefully tucked the ghosts into the pot and kept adding to the top of the tree.


The tree is full ~ 30 in all.


I added a pop of color with an orange Halloween ribbon.

Done!


It was a great craft that I could do with my 9yo daughter.  
She colored the ghosts faces and helped tie the ribbons.

Hope the kids will enjoy their boo-tiful treat!

I'm linking to the following parties:
Sunday Scoop Weekend Wrap Up Party at I Heart Naptime 

Sunday, October 3, 2010

Paint by Numbers


I love all the "number" motifs I've seen on blogs on everything from 
canisters, to planters, to pillows, to chairs ~ so I went to work to create my own.

I painted these stools with leftover paint from a kitchen table project,
and used some brown wall color paint to give them a glaze.  

Initially, the stools seemed a little bare.  They needed 
something to give them a little "umph".
I printed numbers on the computer and put the carbon paper to work,
tracing each number with a pencil.

Once you remove the carbon paper you can see the traced number just enough to paint it.


I used a black sharpie to outline the numbers and filled in with some black craft paint.

 I really like the way the black numbers connect with the black countertop.


 I'm linking to the following parties: