Showing posts with label kitchen. Show all posts

Tuesday, March 19, 2013

e.a.t. and a gallery wall

I've always wanted a little something over this doorway in our kitchen.


And, now I have it!

I purchased some inexpensive 5x5 frames, ran some burlap 
through the printer and voila!


Another quickie project this week was a gallery wall in our powder room.


 We're headed south for Spring Break and I'm hoping to find some 
other 'trinket' to replace the starfish inside the large frame.


Have you been working on any projects this week, small or large?

Petie


Wednesday, February 13, 2013

Nesting

For me, if there's anything good that comes from an awful stomach bug, it's the nesting sensation I get afterwards.  After laying around for a week, I am ready to clean up and clear out!  So far, I've re-organized and weeded out cabinets and closets, and even removed cabinet doors to try another look in the kitchen.


 Before (with cabinet doors - minus one because I started removing them and then took photo)


 After


See those yellow boxes in the cubbies?  

I've been trying to find some kind of storage basket to fill those cubbies as long as we've lived in this house.  They're a "catch-all" for clutter (you can see that in the 1st photo), so I need something to keep the clutter hidden neatly.  

As I was getting groceries at Target, I started paying attention to various box sizes to fit in the cubbies.  I had some criteria - the box contents had to be something our family would eat and  something cheap since I needed 5 of them.  Lucky for my kids, these are ice cream cones!  

More to come on this project later.


Re-organizing the new open kitchen cabinets involved shuffling dishes from another 
closet of dishes/entertaining items, seen here and newly organized.


Hanging over the door is a shoe holder that has worked great for my napkin addiction 
collection, toothpicks, skewers, candles, and lots of other entertaining necessities.


And, last but not least, I have some extra storage in the laundry room 
cabinets that got involved in the organization "shuffle".  

These are all my vases/glassware storage.


I'm beginning to think another name for this post might be "hoarding".....yikes! 

Believe it or not, all of this stuff gets used at one time or another.


Petie

Thursday, January 17, 2013

Toilet Paper Roll Tip of the Day

Probably the biggest pet peeve I have is CORDS (and the "catch all" that is the kitchen island)!

I thought we had solved part of our charger station cord problem last year when we drilled a hole in the kitchen desk, allowing cords to run from the outlet directly to a drawer where things would be hidden.


You see we have one of these poorly placed outlets above the kitchen
 desk...what was the builder thinking?


So, we have a charger station in the desk drawer, but the cord chaos in the drawer was becoming a stress factor for me (and kids who sometimes managed to plug the wrong charger in a device) - enter the labeled toilet paper roll.


Attractive?  No.  

But it works!


Above the desk, I do my best to hide the ugly cord hole.


Overall look.


In our next home, I will be looking for all outlets to be no higher than 12" from the floor!

Do you have any pet peeves that you're constantly trying to control?

Petie

Friday, November 9, 2012

Updated Gel Rug

Are you familiar with "gel" rugs? 

Gel rugs have a spongy thickness, and they're supposed to make standing for any length of time; say washing dishes,  a little more comfortable.

I've seen them in lots of catalogs for anywhere from $70 - $100.  Luckily, I found mine a few years ago at TJ Maxx for about $20.


I recently saw this gel rug 'cover' advertised in the Solutions catalog.  

It inspired me to paint my rug.


I decided to update mine with  a chevron pattern.


The rug has a basket weave pattern already, so it was really easy to tape off for the chevron pattern.


I used Rust-Oleum spray paint that I had on hand (ivory silk), and added 
a top coat to protect the finish .  
 
I may add a coat of polyurethane later just to be sure it's sealed well.


This is what I got when I peeled off the tape....like Christmas morning!


I'm linking to the following parties:


Have a wonderful weekend!

Petie


Sunday, October 7, 2012

Stay at home mom turned plumber?

Last week my 14 year old son was washing his hands (this takes some effort) in the kitchen sink and apparently put too much pressure on the faucet when trying to switch from spray mode to stream mode.  The faucet broke off and water was shooting all over the kitchen.  Quite the scene!


I was left with just the hose to wash dishes :(


The next day I found myself at Home Depot because washing dishes with just the hose that shoots wherever it's aimed was becoming stressful.  I spent about 30 mins in the faucet section and finally selected this one. I am excited to have the addition of the soap pump!


Normally, I would wait for my husband to do help with this project, but he was having a busy work week so I thought I'd try to conquer this task myself and surprise him!  The assembly instructions can be a little intimidating.  Thank goodness for the internet and the many videos on how to replace a sink faucet.


The 1st step was to turn off the water and disconnect the hot and cold hose connections ....easy enough.


I don't have any pictures of the next several steps, but trust me, it was no picnic being crammed into a tiny space under the sink trying to unscrew and disconnect the rest of the parts and pieces that had been there for 11 years.  Ugh!

It took me 2 hours to get the old faucet out.  The good news is I learned a lot about how the faucet is connected so it made the installation of the new faucet much easier :)


Goodbye old faucet!


 Hello pretty new faucet!


 This was a major accomplishment for me, so I've been patting myself on the back ever since :)

 I have a whole new respect for plumbers!

I"m linking to the following parties:
DIY Project Parade at DIY Showoff 


Friday, September 7, 2012

I've missed this place ~


Last September I was knee deep in a volunteer role at my daughter's school.   I dedicated most of the school year to the job and put other activities, like blogging, household projects, etc on hold.  It's good to be back.

I feel back in more ways than one....project time!

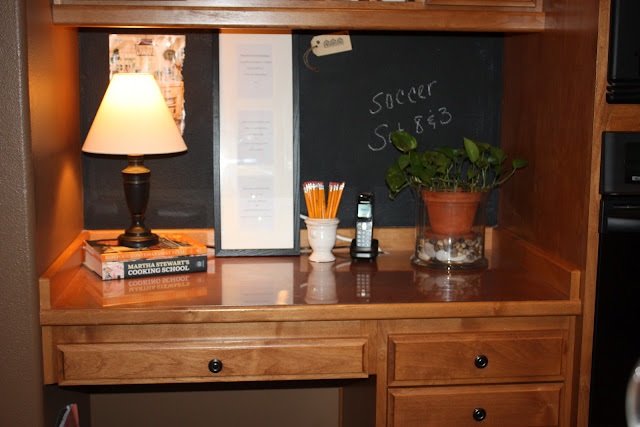
The 1st project I've been working on is adding a chalk/magnetic wall to the kitchen desk area.  This area is kind of the "command center" of our lives so it's a great place for reminders.

Here's what it used to look like:


I taped off the area. This is my 1st time using the Frog Tape for a project.  


As you can see it worked great.....nice clean line. 


I used several coats of the Rust-Oleum Magnetic Primer 1st to add the magnetic piece.
 As you can see it's VERY thick so it needs to be stirred real good.  I rolled it on with 
the paint roller that later had to be trashed.  One thing about the magnetic paint....it's not 
an easy clean-up.  Plan to say goodbye to the roller and/or brushes you use.


Next was the Valspar Chalkboard paint.


I used 2 coats of paint and chalked it thoroughly after it was dry to "season" the wall.


Here's how it looks today:


It's great for hanging notes with magnets (but they have to be strong magnets) 
and for writing a quick note. 


  The tall picture frame is camouflaging these ugly things.  Why would a builder
 put these up high rather than below the desk?


I'm joining the following party: